Download and print out this CorrF Checking Tool derived from Pumping Insulin, and use it to graph the results and adjust your CorrF. Be sure to compare your settings with those of pump wearers in excellent control in the right column of the Pump Settings Tool.
Correction boluses are used to lower high glucose levels to the glucose target. The CorrF or ISF (Insulin Sensitivity Factor) is how many mg/dL (or mmol/L) your glucose drops on each unit of insulin. Once you enter an accurate CorrF into your bolus calculator, it correctly determines the units you need to consistently bring high glucose values down to your target glucose 5 hours later without going low.
Check your CorrF last because it relies on having accurate basal rates and CarbFs. The CorrF is inversely related to the accuracy of your TDD and to your average glucose or A1c. This means that when your TDD is low and average glucose high, larger correction boluses are needed for high glucose readings to offset the missing basal insulin or carb boluses. So basal rates and CarbFs are adjusted first to improve the accuracy of your CorrF significantly.
Remember: smaller CorrF give larger correction boluses; larger CorrFs give smaller boluses. If correction boluses cause low readings, raise the CorrF number, and vice versa.
Correction Factor Checking Tool
To find a close CorrF to check, select the one in the right “corrected” column of the Pump Settings Tool.
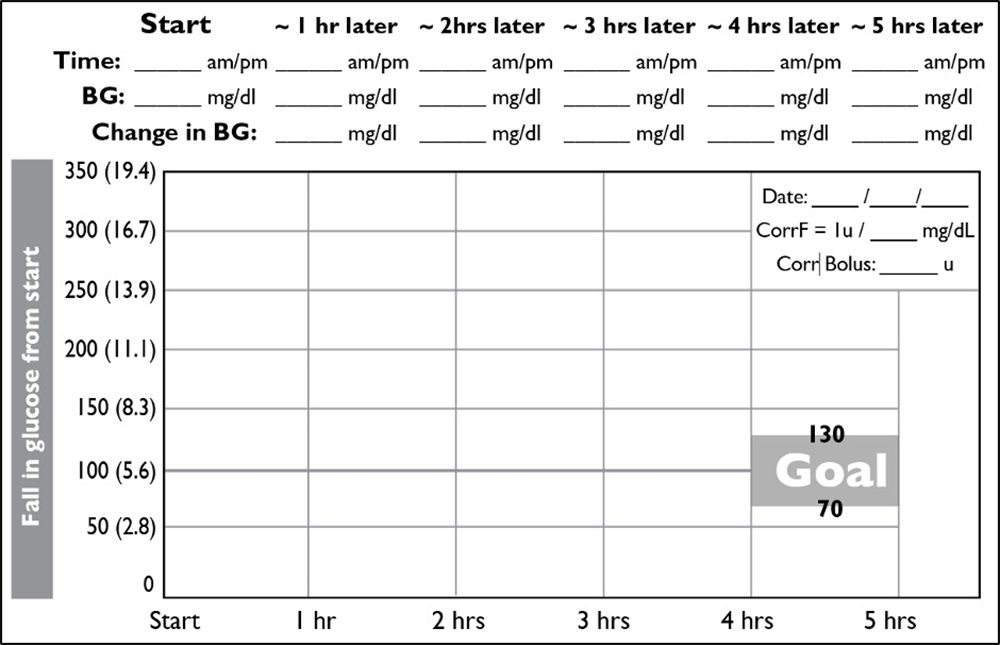
- Start a correction factor check when your glucose is above 250 mg/dL (13.9 mmol/L), you have not eaten in the last 3 hours, and have not taken a bolus in the last 5 hours. Enter this value on the Starting BG line.
- Temporarily set your Glucose Target to 100 in your Bolus Calculator, enter your glucose, and give the correction bolus that your BC recommends. After giving the bolus, reset your Glucose Target to its original setting.
- Check your glucose or look at your CGM screen to record its value every hour. Check also if you feel your glucose is low. Plot how your glucose responds in the graph above.
- You can eat small amounts of protein like nuts, cheese, or a boiled egg during the check but avoid carbohydrates.
- If your glucose goes below 70 mg/dL (3.9 mmol/L), stop checking, treat the low glucose. Then raise your CorrF using Graphic 12.6 and Table 12.7.
- If your glucose stays above 130 mg/dL (7.2 mmol/L), give a correction bolus. Then lower your CorrF using Graphic 12.6 and Table 12.7.
| 12.7 Sample CorrF Changes | ||
|---|---|---|
| These CorrF changes increase the size of correction boluses by 10% in the middle column or decrease them by 10% in the right column. | ||
| Current CorrF | CorrF to Make Corr Boluses 10% Larger | CorrF to make Corr Boluses 10% Smaller |
| 120 mg/dl | 108 mg/dl | 132 mg/dl |
| 100 mg/dl | 90 mg/dl | 110 mg/dl |
| 80 mg/dl | 72 mg/dl | 88 mg/dl |
| 60 mg/dl | 54 mg/dl | 66 mg/dl |
| 50 mg/dl | 45 mg/dl | 55 mg/dl |
| 40 mg/dl | 36 mg/dl | 44 mg/dl |
| 30 mg/dl | 27 mg/dl | 33 mg/dl |
| 25 mg/dl | 22 mg/dl | 28 mg/dl |
| 20 mg/dl | 18 mg/dl | 22 mg/dl |
| 15 mg/dl | 14 mg/dl | 16 mg/dl |
| 10 mg/dl | 9 mg/dl | 11 mg/dl |
Adjust Your CorrF(s) from Your Results
Make changes to your CorrF using Graphic 12.6 as a guide, and Table 12.7 for a suggested amount.
| 12.6 Change Your Correction Factor |
|---|
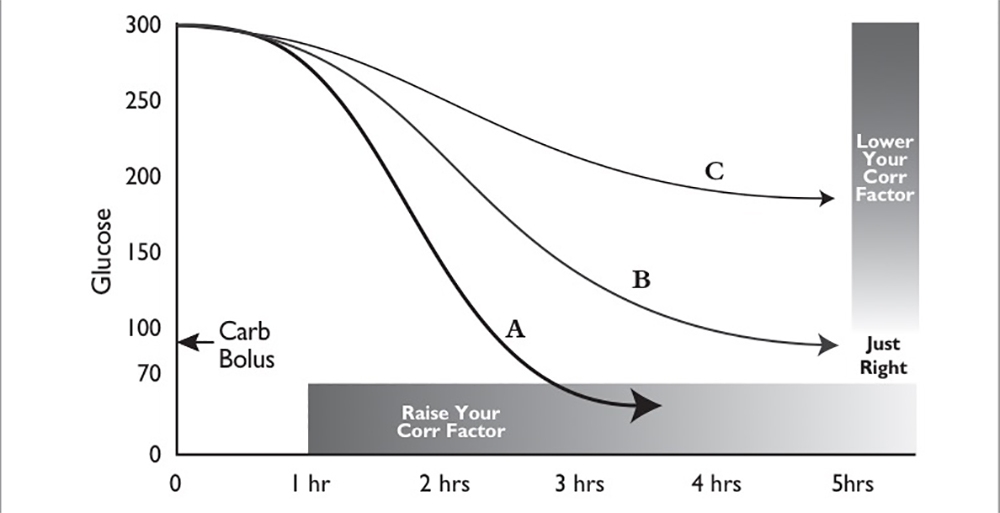 Change your CorrF from your glucose path:
|
Repeat this check and adjust your CorrF until it brings your glucose between 70 and 130 mg/dL after 5 hours. Be sure to compare your settings against those for pump wearers with excellent control in the right column of the Pump Settings Tool.
You’ve now programmed your pump with accurate numbers, customized specifically for you.